
Article sections
Développé à partir d’IKEv1, IKEv2 est un nouveau protocole VPN qui apporte de nombreuses améliorations par rapport à la version précédente. Comparé à IKEv1, IKEv2 est plus stable, il prend en charge le dernier chiffrement qui sécurise la connexion et prend plus de temps à établir. En supprimant le protocole point à point, IKEv2 prend un temps plus court pour établir la connexion.
Depuis la version de firmware 3.8.5 pour les modèles DrayOS et 1.3.0 pour les modèles Linux, Vigor Router commence à prendre en charge IKEv2 pour VPN. Cet article explique comment établir un VPN IKEv2 entre deux routeurs Vigor.
>VPN Server Settings
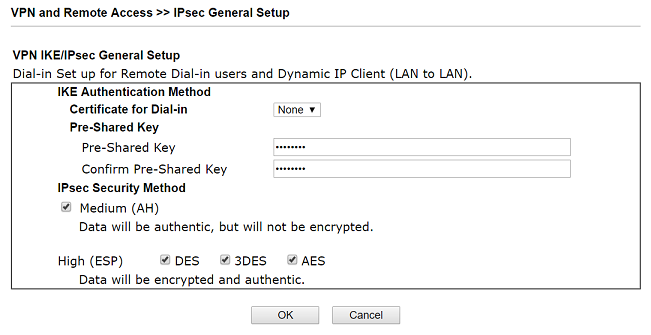
>1. Go to VPN and Remote Access >> IPsec General Setup,
- >Input Pre-shared Key
- >Confirm Pre-Shared Key
- >Click OK
> 2. Go to VPN and Remote Access >> LAN to LAN and click an index available,
- >Check Enable this profile
- >Select Dial-In for Call Direction
>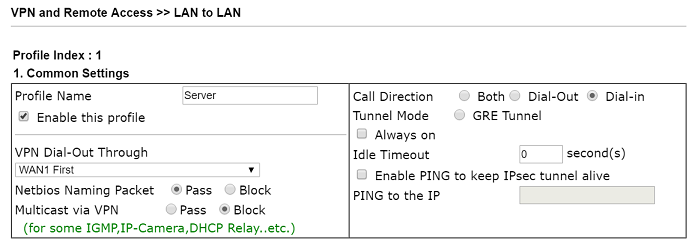

- >Allow IPsec Tunnel in Dial-In Settings
>
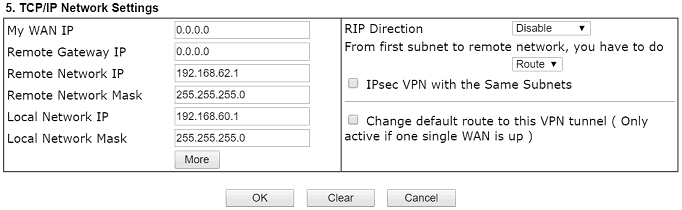
- >For Remote Network IP and Mask, input the IP subnet used by the VPN Client.
- >Click OK
>
>VPN Client Settings
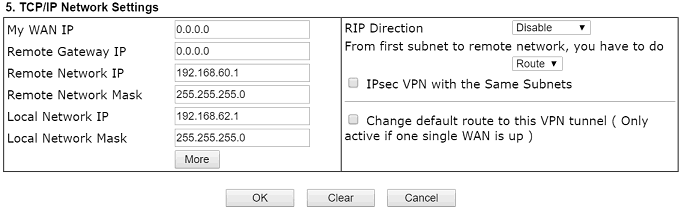
>3. Similarly, create a profile at VPN and Remote Access >> LAN to LAN
- >Give a Profile Name
- >Check Enable this profile
- >Select Dial-Out for Call Direction
- >Select IPsec Tunnel with IKEv2 in Dial-Out Settings
- >Input VPN server’s WAN IP or domain name at Server IP/Host Name for VPN
- >Input Pre-Shard Key of VPN server
>
- >For Remote Network IP and Mask, input the IP subnet used by the VPN Server.
- >Click OK
>
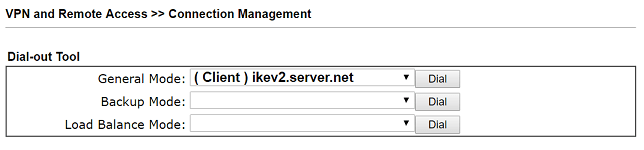
>4. To initiate the VPN, go to VPN and Remote Access >> Connection Management, select the VPN profile, and click Dial
>
>5. When VPN established successfully, the connection status will be shown.
VPN Server Settings
1. Go to VPN and Remote Access >> IPsec General Setup, type a Preshared Key then click Apply.
Typing pre-shared key on IPsec General Setup page
2. Go to VPN and Remote Access >> VPN Profiles and click Add,
Enter the IP subnet used by the VPN Server in Local IP/Subnet Mask
Enter the IP subnet used by the VPN Client in Remote IP/Subnet Mask
Select IKEv2 for IKE Protocol
Click Apply
Setting up Vigor3900 as a IKEv2 VPN server
VPN Client Settings
3. Go to VPN and Remote Access >> VPN Profiles and click Add,
Type the IP subnet used by the VPN Client in Local IP/Subnet Mask
Type WAN IP or Domain of the VPN Server in Remote Host
Type the IP subnet used by the VPN Server in Remote IP/Subnet Mask
Select IKEv2 for IKE Protocol
Type the Preshared Key set in step 1
Click Apply
settings up Vigor3900 as IKEv2 VPN client
4. To dial the VPN, go to VPN and Remote Access >> Connection Management, select the VPN profile, click Connect.
Initiating IKEv2 VPN from Connection Management Page
5. When VPN established successfully, the VPN status will be shown.
IKEv2 VPN established succesfully